31 August 2011

Dentist, Schmentist.

So I went in for a new patient exam and cleaning this morning, sans x-rays (woot!!). Needless to say they were astonished that I have no fillings. I was pretty proud.  Looks like this girl is taking good care of her pearly whites!  They were also impressed that my dental situation has not been affected by my pregnancy. Oftentimes, women get swollen/bleeding gums and a touch of gingivitis during pregnancy. 
Not me- thanks baby girl! ;) 

I guess I'm posting this as a friendly reminder to brush and floss daily. Haha. 
Just like your mother always told you.


I'll be back later today with some exciting updates around the house! Stay tuned.

28 August 2011

Lions and Tigers and Bears...Oh My!

OK so the final mobile project didn't include any of these species, but I was still humming this little tune in my head as I worked. Regardless, it is finished. And I love it.


I also spent a whopping $1.29 on the project. Total.

I bought a 12" embroidery hoop and used only the middle hoop- without the screw closure. I had a couple of small wooden dowels from a past project to make a stable cross in the middle of the hoop. As for fabric and felt, these are all scraps! I also have random papers lying around that I used for the balls.

Here's what it looked like last night...a little nakey.


A close up of each tiny animal. (You can see the owl from here.)


Turtle, Dog: Remmie!, Duck


Remmie booty, nubbin and purple collar included.


Fish

I loved the look so far, but it just needed...more.

This morning I got out my scissors, paper and glue. (Which sounds like I was doing a kindergarten art project.) I created a few more strands to hang around the hoop for more visual interest for Mini Freed.


I have it hanging from the light fixture for now until we get the crib set up. Then it will be prominently displayed over her sleeping quarters.


I think she'll love it. Do you?


25 August 2011

Boo and Geeen.

I've been diligently working on colors with Averi the past couple of weeks. I'm proud to say she's got all of the basics down except red and orange- those are toughies.

Although she can name the right colors, pronouncing them correctly has taken a back seat for now.

Yesterday I set out to find the perfect drawer liner paper for the dresser in Mini Freed's room. I took note of this post from YoungHouseLove, and set out for the same effect.

Looking around town and comparing what I had in my own paper stash, I decided on blues and greens. "Boo and Geeen" if you're Averi.

Here's what the drawers looked like before:


After wiping the insides down, I slapped a layer of Mod Podge (Matte) and then the pre-cut, pre-measured paper.


Here's the after:


The top right and bottom left are a plain silver, just in case you can't tell.


A simple transition, but I must say...it does make the baby socks look pretty darn adorable.


Now on to the next project. I haven't decided what that will be yet, but I know I'm never done.


23 August 2011

Pay It Forward.

Never have I turned my nose up at hand-me-downs. Never will I ever.
My amazing boss and her husband (after discovering they are carrying a boy, due in January) have handed down a HUGE amount of clothing from Averi's wardrobe.

By huge, I mean I practically don't need to buy anything for Mini Freed until she's in size 18-24mo. :) 
This momma is a happy momma.

After sorting sizes and refolding, this is what we now have.


I could not me more thankful!! 
Everyone knows that having a baby is expensive, which is why I'm so appreciative!

Yes, I know, there's a lot of pink in there. Chris and I decided since we're trying to keep pink out of the decorations in the nursery, it can run wild through the clothing stash. I mean, we don't want to completely deprive her of her right to bear pink.

I fully intend on paying it forward when Mini Freed starts to grow out of this lot, which is why this quote is so important.

"One can never pay in gratitude: one can only pay ‘in kind’ somewhere else in life."  
 ~  Anne Morrow Lindbergh

Do some kindness today.


21 August 2011

Pump Up The Party

A few weekends ago, Chris and I traveled back to Michigan for a dear friend's wedding. We spent time with great friends, went to old high school hangouts, and even ate at The Woodshop where Guy Fieri  taped his most recent episode of Diners, Drive-ins and Dives, just this last week! 

Here are a few shots that a friend took, as she happened to be there at the same time.


Apparently, he spray paints his face on the wall at every restaurant he's been to. Another little piece of history for you, Clarkston. This is also a popular hangout for Kid Rock, as his primary residence is in our hometown. Many local residents have gotten used to seeing him around town, hanging at our bars and restaurants. He's been living there for roughly 10 years, so he's not a celebrity anymore, he's a resident.

Back to the wedding.
It was held at the Grosse Pointe Yacht Club- gorgeous- with magical little touches. It was kind of a high school reunion of sorts for Chris and I, and we loved every minute of it. The bride was stunning, as expected.


She was SO excited to see Mini Freed in her pink!


The cake was amazing. Since I can remember, Casey has always been a huge fan of Shark Week. It just so happens that the wedding was the same week as the annual TV marathon. In addition to her love for the series, Casey and her husband went cage diving in South Africa a year ago. I LOVE their incorporation of fun into this sophisticated wedding!


Later on in the night, we went bowling downstairs in the yacht club. Yes, bowling at a wedding.


Not much more needs to be said, really.

All in all, we had a fabulous trip back "home" and can envision ourselves living back there one day. (A long time in the future, after the Air Force has had their way with us.) 

Bye, we'll see you again soon, Mitten!

17 August 2011

Peacock party!

I finished the pillow that I've planned on using in the rocker (once that's complete). I found an inspirational pic after snooping around Etsy.


The creator used recycled fabric and felt to complete this stunning applique pillow.

Here's what I came up with:


I also used recycled items to create mine. For the crest on the head, I used beads.
The longest part of this process was just cutting the individual feathers. 
Sewing it all together was a breeze! 

It should give the room another nice pop of color and keep the monotony of baby pastels at bay.
What do you think?


16 August 2011

Going Green.

It seems like a year ago when I posted that we were rearranging plants in the yard. I also posted pics of a tree and a bush that would be planted in the front yard. Well, I'm happy to say that the tree has finally made the journey into the ground. Wow, we're slackers!

Here's the tree before, as a reminder:


It was so puny! And I almost forgot what kind- a Star Magnolia. I can't wait for Spring again to see this baby in full bloom!


After many months, here she is resting in the front yard:


It definitely helps break up the monotony of the grass. Now if the temperature would break just a little bit more, we could clean out the bed by the house and reshape it- readying it for a landscaping overhaul!

I'm also considering putting up/making some shutters, and possibly painting the front door. Anyone have suggestions on a color? Nothing too traditional, as you know we are far from it. Keep in mind, the brick is a peachy/gray mix. (It's hard for me to type that, but it's not our forever home!)

Happy Tuesday!


15 August 2011

Signage

Slowly but surely I've been adding little touches of "us" around the house. After living in temporary homes for the past few years (thanks to military training), it was hard for me to set up this house in 3 days like I've done with moves in the past. Everything just seemed to be permanent now that we own the house, and I wanted to make certain that I was making the right choices. 

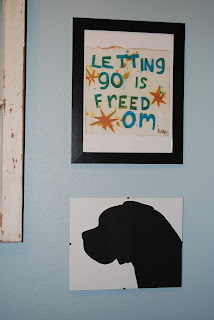
After an enormously ironic wall post from, yet again, Ashley- I found a way to put this piece of art to use. She found a great pic on Pintrest that was just made for my blog. I did some hunting and found a way to print off my own piece of perfection on cardstock.

Here she is hanging in the entryway, looking all purdy.


...and Remmie practicing for another profile painting.


Also this weekend, I put my paintbrushes to use and whipped up a copy of something I'd seen in the recent DIY magazine. Our office has plenty of color everywhere, except above the guest bed. (Which I just now realized that I haven't updated you on its move.) As we were cleaning out the "nursery", we also moved the bed into the office, and situated it as though it were a daybed. I think it totally works in the space, we just need to spruce up the wall behind it a little.

Here are the pups, welcoming you to the guest suite.

And a bit closer of the painting:


Now to just fill that enormous gap to the left of the bed. 
Tan is just too boring to have a plain empty wall!

Come and stay with us- we'd love to have you! 
(You may want to make the trip before the baby comes, though. 
You're sleeping will definitely be interrupted by her!)


Living room/Kitchen upgrades

After many months of trying to get rid of the armoire that's held our bar supplies, I've finally sold it! We finally got a bite on Craigslist, and it was gone a few days later! We're SO happy to not move that heavy thing again. It was a nice storage piece, but not used to it's full potential. We're now in the process of transforming the TV cubbyhole into a bar. We just need to paint the inside and have some custom doors made for the front. 

Here's what the kitchen looked like before:


And here we are today:


Much needed improvement with the curtains, wine racks, and chalkboard calendar. I've even set a place for the pups, haha. I laugh everytime I stop and look at it.


On to the living room. I've had plans of putting up curtains for a long time, and now I've finally gotten around to it. I bought 1 package (two panels) of white cotton grommet curtains from Ikea. I split the curtains up the middle (luckily there were 8 grommets on each panel) to make four skinny curtains. This couldn't have worked more perfectly. We didn't really need a bunch of fabric hanging on either side of the windows, and this makes it proportional.

Before:


After:


Not an enormous difference, but at least it gives the wall some dimension that it was definitely lacking.
See all of our glasses and booze waiting for doors and shelves in the cubby? That's next...once we find someone to make some doors for us. 

She be stylin'.

I've been working hard to get the nursery in gear so that I'm not running around finishing it last minute. We found a sweet old refinished dresser at a local flea market for $89.95.  It's a great solid piece that will work for a long while down the road. The plan is to purchase a changing pad to attach to the top of the dresser.


Cute, huh?

Next I wanted to replace the curtains that are not cutting light out for anything. These were the Anthropologie inspired curtains that I painted in Del Rio. I still love them, but their sheerness is no good for a nursery. This is WITH the blinds closed. God sheds just a little light on this room in the afternoon. HA.


I ran to the fabric store with an idea in mind. Nothing too girly or too neutral with color. 

I finally settled on a yellow and white chevron pattern. 


Thanks to my good friend Ashley, I'm now on board with the chevron craze. I also bought black-out drapery backing. I ran home to complete the project. 
I got it all laid out in the living room, sized just right. 


Remmie helped and Kingston didn't. I simply folded the sides of the chevron over onto the black-out fabric and zipped a quick seam up the sides.


Then I folded the top and bottoms to give it a finished look. All in all, it only took about 1 hour to complete. Not too bad! Here the curtains are in their new home.
 (Blocking every spec of light, I might add!)

 I painted the walls a neutral gray months ago, knowing that I would love the color regardless if we were having a boy or girl. To the left of the window is a sweet vintage map of Arkansas found on Etsy, since baby girl will be born here. 


On the opposite side of the window, an uber cute print (again, from Ashley). Couldn't be more fitting.


The red boxy-thing is an Ikea medicine cabinet that Chris and I used in Corpus Christi. I figured I loved the pop of color, and I could put it to good use for diapering supplies: butt paste, lotions, wipes, etc.


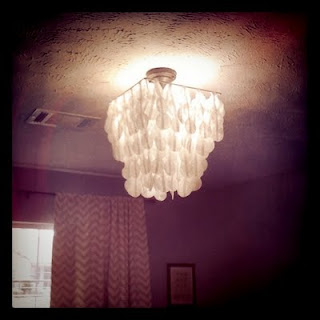
I've also created a light fixture from scratch, because this ugly thing just was not doing it for me.


I left the ceiling attachment with the bulbs up, and created this fax capiz shell chandelier. Without indulging in too much detail (as I've decided to make and sell these puppies in my Etsy store), the shells are wax paper. Awesome. 


I am absolutely in love with it. The best part is that if it gets damaged in a future move, it can easily be fixed for pennies. Pennies. 

Grand total so far in the nursery:
Dresser $89.95
Curtains: $60.00
Vintage map: $7.00
Print: FREE
Diaper cabinet: FREE
Chandelier: $15.00

My next projects for Mini Freed's room:

-refinish a rocking chair from my grandparents that I was rocked in by my parents
-pillow for the rocking chair
-attempt to make my own bumpers for the crib (yet to be purchased)
-more art and knick knacks on the wall
-mobile for above the crib

I've got a lot on my plate, but it is so much more satisfying to get my hands dirty and combine all of my favorite ideas into one room for my baby girl. :)

To leave you on a smiley note...
with the teensy amount of scrap that I had from making the curtains, I threw together this flower.